Arterial line placement is a cornerstone in managing critically ill patients in the intensive care unit and the operating suites. It provides real-time arterial blood pressure monitoring and facilitates frequent blood gas measurements. This guide is designed to equip residents, medical students, and healthcare providers with the essential knowledge to build your skills for arterial cannulation.
While this guide can prepare you for your first arterial line placements, procedural skills are learned through doing either in a simulation lab or under the supervision of trained professionals.
Indications for Arterial Line Placement
The most common indications for arterial line placement included patients who need continuous arterial blood pressure monitoring. This can be divided into two main groups:
- Hemodynamically unstable patients: These are patients who require vasoactive agents or are undergoing volume resuscitation.
- Patients in whom non-invasive blood pressure monitoring is unreliable or unobtainable: These can be patients without an available limb for a non-invasive cuff or limbs that do not fit standard non-invasive cuffs to give accurate measurements.
- A third group that deserves special mention is LVAD patients: Most patients do not have pulsatile flow, and standard non-invasive cuffs will not work.
Contraindications to Arterial Line Placement
The most common common contraindications to arterial line placement at a particular location are:
- Injury or lesion more proximal to your arterial line insertion site (trauma/thrombosis)
- Infection at your insertion site or limb
- Inadequate collateral circulation of the extremity (failed Allen’s test)
Arterial Line Placement Site Selection
Arterial lines can be placed in various locations, each with its own considerations.
Radial Arteries
- The most common site for arterial line insertion
- Offers a convenient artery location for procedures
- Quick learning curve
- Low complication rate
- Allen’s test to assess collateral blood flow from the ulnar artery
Dorsalis Pedis and Posterior Tibial Arteries
- Lower extremity access sites
- Used when other sites are not accessible
- An alternative approach to radial arteries
- It can be a challenging placement with an awkward insertion angle
Femoral Arteries
- A large artery with high flow
- Located near the inguinal ligament
- Can provide more accurate arterial pressures when on high-dose vasopressors
- Potential for retroperitoneal bleeding with the puncture of the back wall of the artery.
Brachial Artery
- Less common, used for specific medical and surgical conditions
- High-risk location with a lack of collateral flow to the hand
For more on central lines, read our article on Central Line Safety Programs.
Risks and Benefits
| Arterial Site | Benefits | Risks |
|---|---|---|
| Radial | Easy access, low complication rate, collateral flow | Arterial spasm, prone to dampening with high dose pressors |
| Dorsalis Pedis and Posterior Tibial Arteries | Low use rate, good for ICU or OR procedures, collateral flow | Arterial spasm, local infection, avoid location in patients with diabetes |
| Femoral | High blood flow, emergency use | High-risk vascular infection, blood clots |
| Brachial | For use in specific medical and surgical conditions | High complication rate, no collateral flow, Upper extremity impairment from brachial artery thrombosis |
- Key Points:
- Radial artery cannulation has the lowest risk
- The femoral artery carries a higher risk of infection.
- Dorsalis Pedis and Posteriorl Tibial arteries are alternative sites
Step-by-Step Guide to Performing Radial Arterial Line Placement
- Preparation: Sterile gloves, local anesthesia, and all necessary supplies.
- Patient Positioning: Arm board under the non-dominant hand, head of the bed elevated.
- Puncture Site: Radial pulse identified, skin sterilized.
- Needle Insertion: Needle tip advanced until a flash of blood appears.
- Catheter Insertion: Guidewire and catheter advanced using an aseptic technique.
- Securing: Adhesive tape and transparent dressings applied.
- Key Points:
- The success rate depends on technique and experience.
- Aseptic technique to minimize infection
- Operating room standards should be maintained
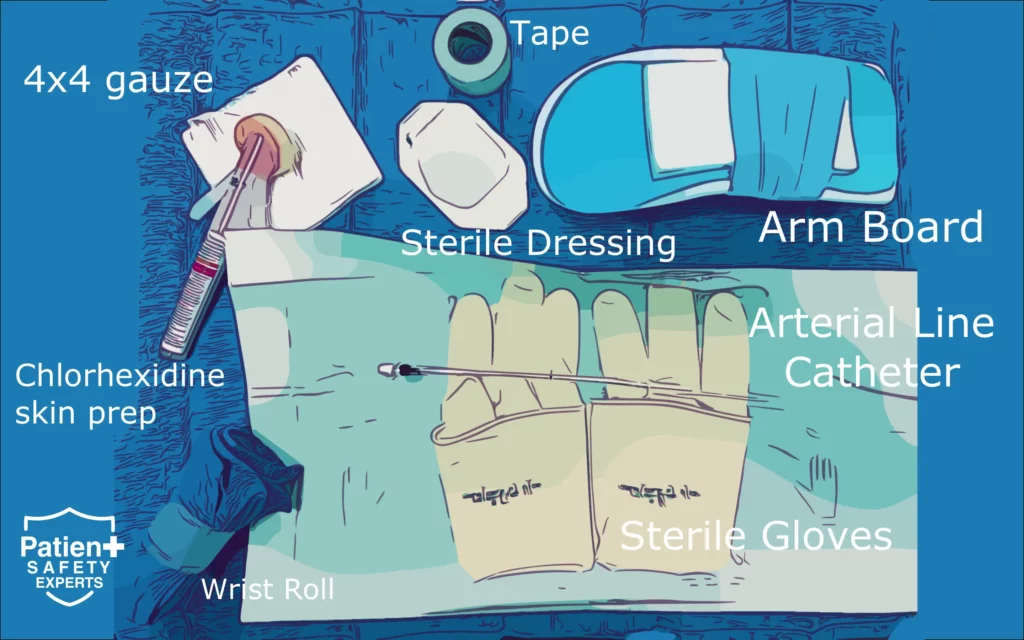
Step 1. Gather Equipment
- Start by obtaining a prepackaged radial artery catheterization kit, which should include essential items like iodine or chlorhexidine solution, dorsal wrist extensor splint, 1% lidocaine for local anesthesia, 4×4 gauze squares, adhesive tape, catheter-over-the-needle, and a compatible spring wire guide.
Step 2. Prepare the Patient
- Extend the patient’s wrist with a small towel roll to help identify the radial artery insertion site.
- Relocate any wristbands or identification bands to the other wrist if possible.
- Secure the patient’s arm and hand with tape if necessary.
- Palpate the radial artery to locate it, clean the skin with an antiseptic solution,
- Arrange a sterile drape and inject local anesthesia.
Many arterial lines remain in place for days; it is essential to maintain sterile technique and insert them under aseptic conditions to prevent local infection or seeding of other sites.
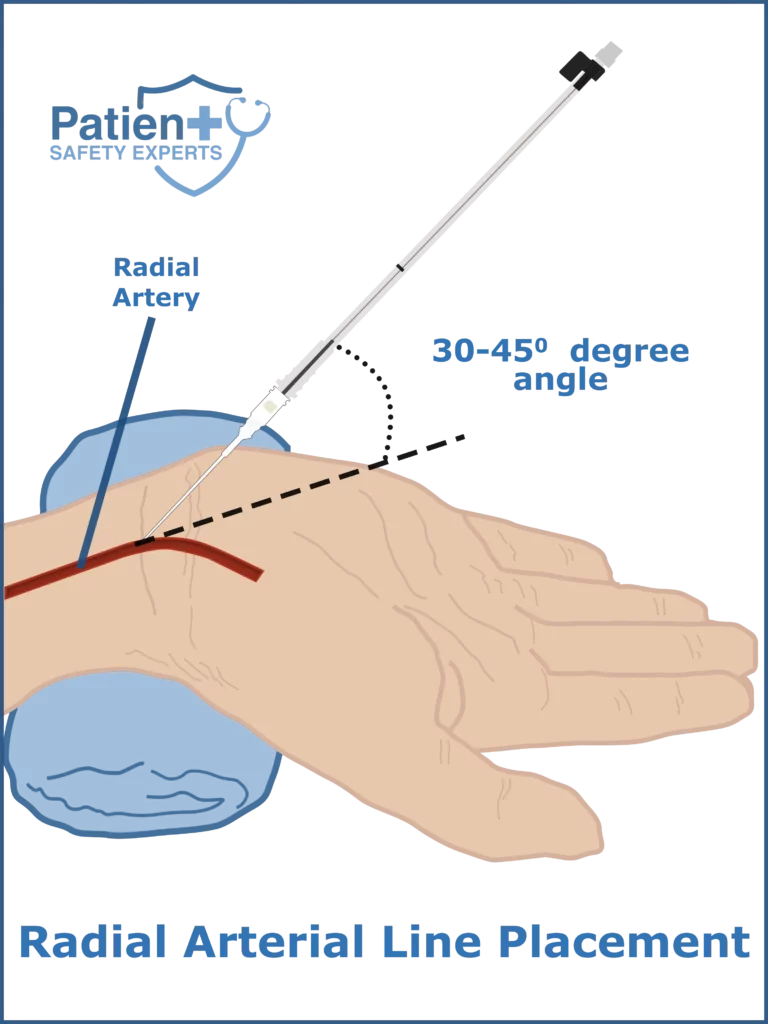
Step 3. Puncture and Insert
- The most common arterial cannulation device used today is a one-piece catheter-over-the-wire kit.
- Place the pointer and middle fingers of your non-dominant hand over the radial artery to palpate the pulse.
- Insert the needle at a 30-45-degree angle and advance the needle in a continuous motion to puncture the artery.
- Once the needle enters the artery, you will observe a flash of blood in the needle hub, stabilize the catheter-over-the-needle, and confirm that the arterial blood continues to fill the chamber.
Step 4. Advance the Guide Wire
- Using the actuating lever, gently advance the guide wire into the radial artery lumen.
- Pay close attention to when the lever passes the black line along the device’s chamber; if you encounter resistance, slide the wire back and confirm you still have blood flow.
- Avoid forcing the wire insertion and instead reposition the needle tip to allow passage of the wire along the arterial lumen.
- If you cannot pass the wire, withdraw the entire unit and apply pressure to the insertion site before retrying.
As an advanced technique, you can advance the entire needle and catheter through both the anterior and posterior walls of the artery to perform the through-and-through technique.
Step 5. Confirm Placement
- After successfully placing the guide wire in the radial artery, push the needle hub and advance the catheter over the guide wire into the artery.
- Remove the guide wire and needle and observe for pulsatile blood flow, which confirms proper placement.
Step 6. Secure the Line
- Connect the transducer and tubing to the catheter, and use a transparent adhesive dressing (e.g., Tegaderm) and tape to secure the catheter in place.
Clinical Pearl: Never inject anything into an arterial line, as elevated drug concentration in arteries and capillaries can cause severe ischemia and limb damage.
Complications:
Complications can be divided into three main buckets.
- Infection due to lack of or poor sterile technique
- Local trauma to the artery or local hematoma
- Thrombosis of the artery with the risk of causing distal ischemia if collateral flow is absent.
Troubleshooting and Patient Care
Common issues include:
- Damping: Often due to blood clots or arterial spasms.
- Overdamping: Caused by kinks in the line.
- Underdamping: Due to long catheter or narrow lumen.
- Key Points:
- Use of ultrasound for troubleshooting
- Real-time monitoring is essential
- Frequent blood sampling for arterial samples
For more on patient safety, please read our guide on Optimizing a Sepsis Program.
Conclusion
Arterial line placement is an essential skill for healthcare providers working in intensive care units or operating rooms. It is crucial for invasive blood pressure monitoring, arterial blood sampling, and overall patient care.
References
- “Arterial Line Placement in Adult Patients: A Clinical Study,” Journal of Intensive Care Medicine, 2021.
- “Invasive Procedures in the Intensive Care Unit,” New England Journal of Medicine, 2020.
- Central Line Safety Programs
Note: This article is intended for educational purposes and should not replace professional medical advice.